Introduction
Freeboard is an Openlayers based chart plotter that uses Signal K communication protocols and Signal K server features to provide the following functionality:- Moving Vessel / Map display with vessel Heading / Bearing and True Wind / Apparent Wind lines.
- Charts: display including both online and locally hosted.
-
Resources: List and filter Routes, Waypoints, Notes and
Regions.
- Add / Edit / Delete resources
- Set active route
- Import resources from GPX files.
-
Alarms / Notifications:
Displays both visual and audible notifications.
- Anchor Watch
- Depth
- Crossing Vessel / Closest Approach
- Hazardous Region entry
- Instrument Panel: allows you to select from the apps installed on your Signal K server for display.
- Other Vessels: display other vessels on map.
- History Playback: replay timeseries data from the Signal K server.
Visit us at GitHub
Signal K Server
Note: Freeboard-SK requires the Signal K server to implement the following APIs:- Resources API: for the storage and retrieval of resources
- Course API: to set a destination or activate a route
- Autopilot API: to enable autopilot operations
Therefore Freeboard requires that the host Signal K server be able to service requests to the following paths for all functionality to be available:
- resources/routes, resources/waypoints, resources/notes, resources/regions - Serve resources as well as accept and persist resource data submitted to these paths.
- resources/charts - Serve chart resources.
- navigation/anchor, notifications/navigation/anchor - Serve and accept `position`, `maxRadius` values as well as calculate `currentRadius` and serve notifications.
- notifications/environment/depth - Serve notifications for belowKeel, belowSurface and belowTransducer.
- notifications/navigation.closestApproach .
- Standard Alarms - Serve notifications for notifications/mob, notifications/sinking, notifications/piracy, etc.
-
navigation/course (Signal K Course API) - freeboard makes
use of the course API to set a destination or activate a route.
It is expected that the server will initiate any subsequent calculations and related value updates.
Node Server Plug-ins:
When using Signal K node server you will need to install plug-ins to service the paths outlined above to enable the relevant Freebaord-SK functionality. Following is a list of recommended plugins that will enable the required server functionality:| Function: | Plugin: |
| Resource Storage and Retrieval | @signalk/resources-provider |
| Chart display |
@signalk/charts-plugin signalk-charts-provider-simple signalk-pmtiles-plugin |
| RADAR Overlay |
signalk-container @marineyachtradar/signalk-plugin |
| Course data (DTG, VMG, ETA, etc) | @signalk/course-provider |
| Anchor Watch |
signalk-anchoralarm-plugin hoekens-anchor-alarm |
| Depth alarms | signalk-simple-notifications |
| Closest approach / Crossing vessel |
@signalk/collision-alerts signalk-derived-data |
| History Playback | signalk-to-influxdb |
| Buddy vessel identification and notifications | signalk-buddylist-plugin |
| Display vessel country flag | signalk-flags |
Display
Freeboard provides a moving Vessel / Map display for both your vessel and other vessels
 .
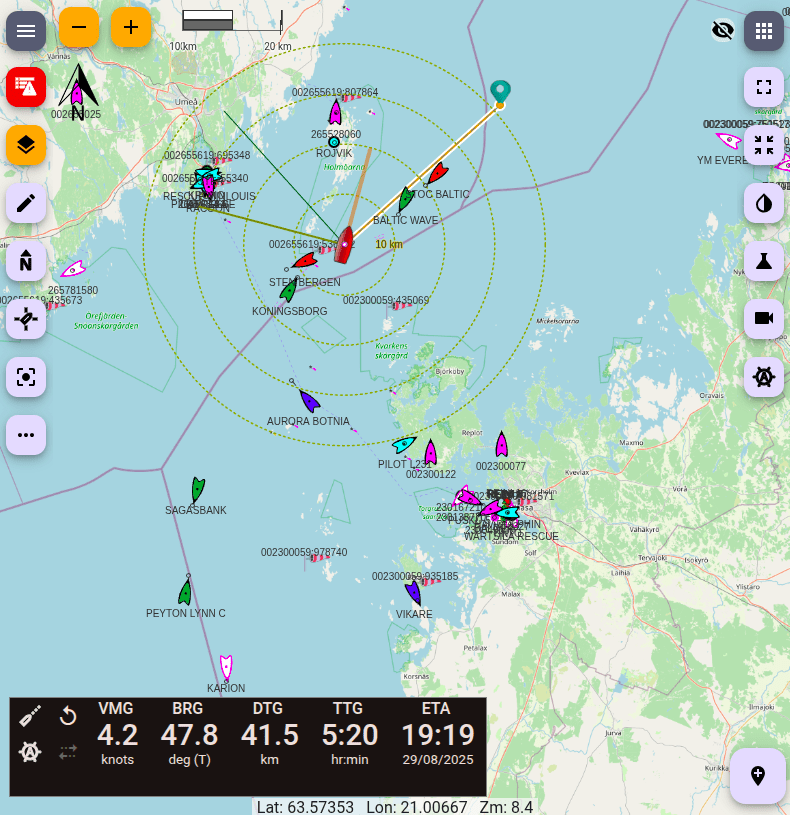
Status Area: Provides visual indication of the following conditions.
- signal_wifi_statusbar_connected_no_internet_4 No server messages: Indicates messages are not being received from the server — either the connection has closed (for example the server was stopped or restarted), or nothing has arrived over an open connection for the last 8-10 seconds. It clears when the connection is re-established.
- directions_boat Vessels hidden: Indicates vessels are not being displayed.
- local_offer Notes hidden: Indicates notes are not being displayed.
- compare_arrows Course hidden: Indicates course information is not being displayed.
- visibility_off Wake lock off: Indicates that the device wake lock is off.
Left menu bar: Provides access to functions that allow you control the map display. If the screen is too short for every button, the ones that don't fit are listed at the top of the More Actions menu, which moves to the bottom of the bar.
- menu Main Menu: Displays the main menu. (See menus for more.)
- warning Alarms: Displays the alarms screen to raise / clear alarms. (See alarms for more.)
- layers Resources: Provides access to resources such as Charts, Routes, Waypoints, etc. (See resources for more.)
- edit Draw Menu: Provides access to options that allow the drawing / editing of resources. (See menus for more.)
- navigation Heading / North Up: Toggles between Heading / North Up mode.
-
 Center & Follow Vessel:
Turns on Follow Vessel mode, centering the vessel on screen
and keeping it there. The button is highlighted while follow mode
is on; press it again to turn follow mode off, leaving the chart
where it is.
The vessel is held exactly centered for a couple of seconds before easing out to your Offset Vessel Center setting, so a second press straight away leaves it dead center — press twice to simply center the vessel.
Note: this option is disabled when vessel position is not available. -
more_horiz
More Actions: Provides access to the following options:
- Clear / Refresh Vessel Trail: When trail is available from the server selecting this menu item will reload the trail from the server.
- Stop Navigating: clears the active destination or de-activates an active route.
- Clear Course Data: clears the current course data.
- Trail to Route: create a route from the current vessel trail.
- Show / Hide Course Data: Toggle the display of course data.
- Show / Hide Vessels: Toggle the display of other vessels.
- Show / Hide Notes: Toggle the display of notes.
- Show weather forecast data. Weather forecast data from the weather station closest to the vessel location. (Requires Weather API enabled in Server Admin -> Plugin Config -> Freeboard-SK)
- Settings: Open the Settings screen.
- What's New: Open the Feature Browser to browse and search everything Freeboard can do.
Right menu bar: Provides access to quick-actions and experiments. If the screen is too short for every button, a more_horiz button at the bottom of the bar lists the ones that don't fit. See the Feature Browser → Toolbars on Small Screens.
-
av_timer
Instrument panel: The instrument panel is used to display
selected Web App(s) installed on the Signal K server.
The default instruments shown are @signalk/instrumentpanel
Use the Settings screen to:- Select the Web App to display
- Select one or more Favourites that can be switched into view by using the arrow_back_ios and arrow_forward_ios buttons.
- You can also open the displayed Web App in it's own window by clicking the open_in_new button.
-
volume_off
Web Audio Off:
Displays if browser audio is NOT activated. If displayed then no
alarm sounds will be audible.
Click this button to enable web audio to hear alarm sounds. -
fullscreen
Fullscreen mode:
Displays application in fullscreen mode.
Available only on supported devices. -
science
Experiments:
Provides access to experimental features which are being
considered for inclusion into the main application. See
experiments for more.
-
videocam
Video:
Displays the video stream that has been configured in
settings.
Available only on supported devices. - zoom_in_map Constrain map zoom: Limit minimum and maximum zoom levels to the zoom extent of the selected charts.
- invert_colors Invert Map feature text label color: Toggle the text label color of features to improve visibility on dark map backgrounds.
- vertical_split Split view: Opens a second chart beside or below the main one; press again to close it. Shown when Enable split view is checked in Settings. See the Feature Browser → Split View.
-
 Display Autopilot console:
Available when the Autopilot API is detected on the server.
Displays the autopilot console enabling operations permitted by
the Autopilot API.
- add_location Drop Waypoint: Place new waypoint at vessel location.
Context "Right click" Menu : Click the right mouse button anywhere on the map to display a context menu. On a touch screen, press and hold.
The options available may vary based on the current application state. Plugins can add their own commands at the bottom of the menu. See the Feature Browser → Extension Menu Commands & Chart Picks.
Note:The "Add Note here" option is only available at zoom levels where Notes are visible on the map.
Vessel: displays the current position and heading of your
vessel.Note: Vessel icon is not displayed when vessel position is not available.
Note: The vessel icon is dimmed and marked with a red question mark when position data stops arriving. See the Feature Browser → Own Vessel Display.
Additionally, Heading, Bearing True Wind Direction and Apparent Wind Angle lines are displayed with the vessel when the related data is available.
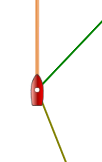
|
|
Heading |
|
|
bearing |
|
|
True Wind |
|
|
Apparent Wind |
 Active Vessel: displays the current position and heading for a
vessel where an update has been received within the time period
selected in
Settings->Vessels->Mark AIS Target Inactive After (default = 6
mins).
 Inactive Vessel: displays the last received position and
heading for a vessel for which an update has NOT been received within
the time period selected in
Settings->Vessels->Mark AIS Target Inactive After (default = 6
mins).
Note: Vessels are removed from display after there has been no update received within the time period selected in Settings->Vessels->Remove AIS Target After (default = 9 mins).
Clicking on a vessel icon will display an information window containing vessel data and available actions.
Vessels can be flagged to identify them when there is a large number of vessels in the vicinity.
Navigation
Freeboard will display course data when received from the server. You can set a destination in the following ways:- Activate a Route: Once activated, select a point along the route.
- Go To Waypoint: Select a waypoint as a destination.
-
Navigate to here: Right click anywhere on the map and
select the option from the menu.
If the server stops sending course data, the last received values will remain on the screen.
To hide the course data display until the next set of data is received, click more_horiz and select Clear Course Data from the menu.
The course data panel can be dragged to another part of the screen (on a touchscreen, press and hold it first). See the Feature Browser → Following a Route.
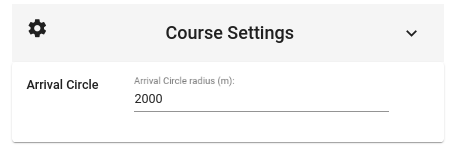
 Click to display the Course Settings screen.
From this screen values such as Arrival Circle can be set.
replay Click to restart course calculations from the current vessel position.
multiple_stop When a route is active click this button to reverse the direction of the route point sequence.
Autopilot status indicator.skip_next When a route is active click this button to advance to the next point in the sequence, steering straight to it from the vessel's position.
skip_previous When a route is active click this button to advance to the previous point in the sequence, steering straight to it from the vessel's position.
- A waypoint card in the Waypoint List
- The pop-up displayed when a waypoint is clicked.
Autopilot
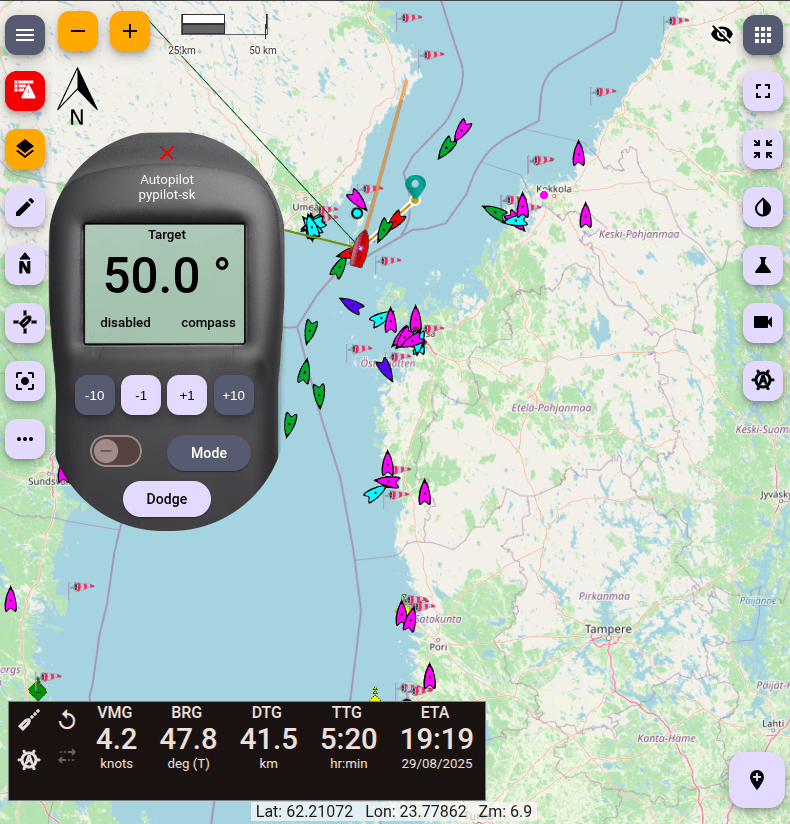
Freeboard-SK supports the Signal K Autopilot API which enables common
operations to be performed including:
- Engage / Disengage the autopilot
- Setting the operation mode e.g. compass, route, gps, etc.
- Setting and adjusting the target heading
- Dodging obstacles
button at the right of
screen.
The autopilot can be engaged via the
button in the course data
panel.
 RADAR Overlay
Freeboard-SK supports the Signal K RADAR API which enables
communication with RADAR devices via a MaYaRa server.When RADARs are detected, Freeboard-SK will display the
button, which shows the RADAR on the map and opens the RADAR control
panel.
In the RADAR control panel you are presented controls to:
- Switch the RADAR between Standby and Transmit.
- Show / hide the RADAR and its range rings on the map.
- Set the RADAR range and the opacity of the overlay.
- Display / Set all of the controls the RADAR offers.
- Draw and edit the RADAR guard zones.
When multiple RADAR devices are present you can choose one from the RADAR name in the control panel, or select the preferred device in SETTINGS.
For how to use these controls, see the Radar Overlay and Radar Guard Zones entries in the Feature Browser (Main menu or More actions → What's New).
Note: To enable RADAR support your Signal K Server must have both the signalk-container and @marineyachtradar/signalk-plugin plugins installed.
layers Resources / Layers
Freeboard provides Create / Update / Delete (CrUD) functionality for all in-built Signal K resource types: routes, waypoints, charts, notes and regions.Each resource type is managed in a separate map layer which can be controlled from the layers toolbar button, which when clicked will contain options for the various resource types.
Resources can be grouped which enables them to be displayed or hidden with a single click.
Additionally resources can be exported to a GPX file by selecting the save Export menu.
Tracks imported from GPX or GeoJSON files are listed under show_chart Tracks. See the Feature Browser → Imported Tracks.
- category Resource Groups
Selecting a Group will display the resources within the group on the map and hide the other resources of the same type. A type with nothing in the group is hidden when Hide is checked for it in the Group's properties, and otherwise left as it is. Charts are left as they are unless the group contains charts.
Resources can be added to groups directly from the specific resource list (e.g. Routes, Waypoints, Regions, Charts) or when editing a Group's properties.
Note: A resource can belong to more than one resource group.
-
add New Group: Create a
new resource Group.
Note: By default if no resources are listed for a specific resource type (e.g.regions) then all resources of this type will be hidden from display.
To keep these resources displayed uncheck the Hide checkbox. -
edit
Update Group: Display / update a Group's properties.
Use this to:
- Rename the group
- Display the resources within the group
- Add and Remove resources from the group
- delete Delete Group: Delete the group. Note: This does NOT delete the resources!
Freeboard will try to create a resource collection on the Signal K server to store resource groups.
Note: this requires that:
- You are logged in to the Signal K server
- resources-provider plugin version 1.4.1 or greater is installed on the server
To do this:
- In the Signal K server Admin console select Server | Plugin Config
- Select the Resources Provider plugin
- In the Resources (Custom) section, click add and type groups in the Resource Type
- Click Submit
- layers Overlays
- directions Routes: Displays a list of available Routes.
- Filter Routes: Type into the text box to filter the list of routes.
- Display Route: Check the checkbox to display the route on the map.
-
Delete Route: Click
delete and you will be prompted
to delete the route.
-
Points: Click flag to
view a list of route points where the following actions can be
performed:
- near_meNearest: Activate the route starting at the point nearest the vessel.
- clear_allClear: De-activate the route.
- Start at / Set the selected point: Click near_me next to the point to set as the current destination along the route.
-
Re-order points: Use the handle to drag points to a
new position in the list.
Note: If points of the Active Route have been re-ordered then you will not be able to set the destination point until changes have been applied.
- Notes: Clicking local_offer displays a list of Notes associated with the route. From this screen you can add, edit or delete notes.
-
Start: Clicking
near_me sends a message to the
server to set this route as the Active Route.
The start of the route is set as the current destination.
Use the Previous and Next point options in the more_horiz menu to select the destination point. - Stop Navigating: Clicking clear_all sends a message to the server to clear the Active Route.
- Edit Properties: Click edit to edit route Name and Description.
- Add to Group: Click category Add route to a Resource Group.
- Move: Clicking touch_app allows route points to be re-positioned.
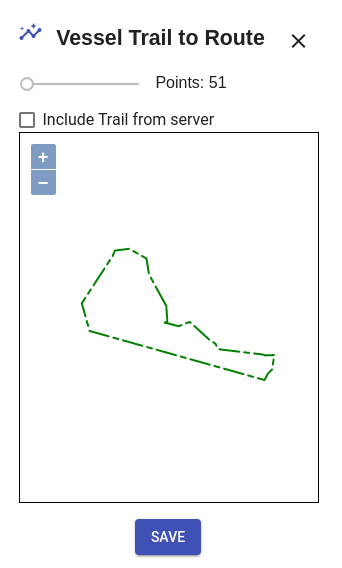
Trail to Route
You can create a route from the current Vessel trail by selecting the option from either the context menu or the more_horiz menu.

-
The Trail to Route screen is displayed and the route generated
from the locally stored vessel trail is shown.
-
Check the Include trail from server if you want to
include trail data stored on the server.
Recommended when the vessel trail comes from the server (Track source in Settings). - Slide the tolerance control to vary the conversion algorithm in order to get the desired point distribution.
- Once satisfied with the generated route click Save to save the route to the Signal K server.
- location_on Waypoints: Displays a list of available Waypoints.
- Filter Waypoints: Type into the text box to filter the list of waypoints.
- Display Waypoint: Check the checkbox to display the waypoint on the map.
-
Delete Waypoint: Click
delete and you will be prompted
to delete the waypoint.
Note: A waypoint may be associated with a route. so take care when deleting waypoints! - Notes: Clicking local_offer displays a list of Notes associated with the waypoint. From this screen you can add, edit or delete notes.
- Go To: Clicking near_me sends a message to the server to set this waypoint as the target to navigate to. The server should then send navigation data in relation to this location.
- Clear: Clicking clear_all sends a message to the server to clear the current destination.
- Center: Clicking center_focus_strong positions the map so the waypaoint is displayed in the center.
- Edit Properties Click edit to edit waypoint Name and Description.
- Add to Group: Click category Add waypoint to a Resource Group.
You can also click on a Waypoint on the map to display an information window with additional actions.
- Move: Clicking touch_app allows waypoints to be re-positioned.
- local_offer Notes: Displays a list of available Notes.
- Filter Notes: Type into the text box to filter the list of notes.
-
Draft Notes: Click
border_color to display only
draft notes in the list.
- Display Notes: Check the checkbox to display notes on the map.
- Group: Clicking styles will display a list of notes in the same group.
- Properties: Click info_outline to open the note information / editor screen.
Freeboard uses specific key / value pairs that are defined within the
properties: {} block of a note: - draft (boolean): Indicates whether the note is in draft mode. Used by the server to determine the visibility or scope of where the note is made available.
- readOnly (boolean): Used by Freeboard (when meta._attr is not available) to determine whther the note is editable.
properties: { draft: true, readOnly: false }
Freeboard supports the following chart types:
- Image Tiles: The most popular format for serving maps, uses a collection of image tiles (usually in .png or .jpg) format loaded using X,Y & Z identifiers e.g. http://host_path/{z}/{x}/{y}.png
-
Vector Tiles: Provided in a similar way to Image Tiles,
the tiles contain vector information rather than a raster image.
This makes them smaller in size and the tiles are "drawn" on to
the display.
Vector tiles normally require a related "STYLE" to display the elements with specific colors, etc.
Note: Vector tiles that are not sourced via a mapbox style definition (mapstyleJSON), will have a very basic style is applied to color lines and fill polygons.
S57 ENC converted to vector tiles: Freeboard-SK is able to display S57 ENC charts that have been converted to vector tiles with s57-tiler.
Note: Only unencrypted ENC's are supported (no S63 support).
- mapstyleJSON: A mapbox style JSON file which defines sources and styles of vector tiles maps.
- WMS: A Web Map Service which serves geo-referenced image tiles.
- WMTS: A Web Map Service which serves pre-rendered tiles.
- PMTile (Protomap): A single-file archive format for tiled data which can be hosted on commodity storage.
- Filter Charts: Type into the text box to filter the list of charts by name.
- In view: Toggle this switch to list only the charts that cover the current map view. The switch stays as you left it.
- Bounds: Toggle this switch to display the bounds of the listed charts. The bounding rectangle of each chart will be overlayed on the current map display.
- Re-order charts: Drag a chart by its drag_indicator handle to move it up or down the stack. The handles are hidden while the list is filtered.
- Add Chart Source: Click add to add a new chart source (WMTS, WMS or JSON Map Source). See the Feature Browser → Adding a Chart Source, or the Freeboard-SK Wiki for more details.
- Properties: Click info_outline to display the chart properties. For a chart source you added yourself, the name, layers and auto-refresh interval can be edited here.
- Opacity: Click opacity and use the slider to set the chart's opacity.
- Image Adjustment: Click tune to set the brightness and contrast of an image-based chart.
- Minimum Zoom Level: Click vertical_align_bottom to set the lowest zoom level at which an image-based chart is displayed.
- Time: Click schedule to show a time-varying chart (weather radar, satellite, forecast) at another frame, step or play through its frames, and return to its newest frame (for a forecast, the current hour). Closing the palette does the same. See the Feature Browser → Time-varying Charts.
-
Cache Tiles: Click
download to select an area on
the map for which chart tiles will be cached.
Note: This option is only available when a chart is defined as proxied by the chart provider.
- Add to Group: Click category Add Chart to a Resource Group.
- Display Chart: Check the checkbox to display the chart.
- Plugin layers: Map layers drawn by Signal K server plugins are listed at the top, above the charts. Check the checkbox to display a layer, click opacity to set its opacity and, where the plugin offers settings, click tune to open them. See the Feature Browser → Extension Map Layers.
- OpenStreetMap
- OpenSeaMap
Local Charts hosted on the Signal K server are identified with the map icon.
Charts you have not re-ordered are stacked in descending order of scale, so that more detailed charts are on top. Once you re-order the chart stack your chosen order is used instead, and the chart list itself is displayed in that same order (top layer first).
For how to use these controls, see the Chart List entry in the Feature Browser (Main menu or More actions → What's New).
- tab_unselected Regions: Displays a list of Regions.
They can be attributed as hazardous areas which will create an alarm which will sound when the vessel position is inside the region's bounds.
- Filter Regions: Type into the text box to filter the list of regions.
- Properties: Click info_outline to display the chart properties.
- Add to Group: Click category Add Region to a Resource Group.
- Display Region: Check the checkbox to display the region.
- Click on the Region
- Select info_outlineInfo
- Check Hazardous Area
- Click OK to save.
saveExport (to GPX)
- Click the layers Resources toolbar button and select the save Export option from the menu.
Additionally, the vessel trail can be saved as a GPX track, whether it is kept on this device or fetched from the server.
A single vessel's track can also be exported from its popup with download Export track to GPX. For the track ranges that can be saved, see the Feature Browser → Export to GPX.
- Waypoints: Click the checkbox to select all Waypoints or expand the list and select the Waypoints to export.
- Routes: Click the checkbox to select all Routes or expand the list and select the Routes to export.
- Tracks: Click the checkbox to select all Tracks or expand the list and select the Tracks to export.
uploadImport (GPX, GeoJSON)
- Click the layers Resources toolbar button and select the upload Import option from the menu.
Depending on the type of file selected, you will be presented with one of the following.
GPX File
- Waypoints: Click the checkbox to select all Waypoints or expand the list and select the Waypoints to import.
- Routes: Click the checkbox to select all Routes or expand the list and select the Routes to import.
- Tracks: Click the checkbox to select all Tracks or expand the list and select the Tracks to import.
GeoJSON Feature Collection
The following GeoJSON features are supported and are mapped to one of the Signal K resource types:
| GeoJSON feature type | Signal K Resource type | |
| LineString | arrow_forward | Route |
| Point | arrow_forward | Waypoint |
| Polygon | arrow_forward | Region |
| MultiPolygon | arrow_forward | Region |
| MultiLineString | arrow_forward | Track |
Check out the Freeboard WIKI for more details.
{
    "type": "FeatureCollection",
    "features": [
        {
            "type": "Feature",
            "geometry": {
                "type": "LineString",
                "coordinates": [..]
            },
            "properties": {
                "name": "myRoute",
                "description": "a GeoJSON route"
            }
        },
        {
            "type": "Feature",
            "geometry": {
                "type": "Point",
                "coordinates": [..]
            },
            "properties": {..}
        }
    ]
}
A MultiLineString track can carry the time of each point in a coordTimes property. For how tracks are stored and listed, see the Feature Browser → Imported Tracks.
uploadResource Set
Freeboard allows you to upload resource data stored in files to `non-standard` resource paths that accept `PUT` or `POST` requests.To upload data:
- Select the uploadResource Set menu option.
-
Select the desired destination path from the drop-down list.
Note: only paths detected under `signalk/v2/api/resources` are listed. - Click and select (or drop) the file containing the resource data.
- Click Load to upload the file contents to the server. Important: Freeboard does not attempt to validate the file contents in any way so please ensure you are uploading appropirate content for the selected destination.
anchor Anchor Watch
Anchor Watch sets an anchor alarm: the Signal K server watches the vessel's position and raises an alarm when it moves outside the alarm radius around the anchor. It requires the signalk-anchoralarm-plugin or hoekens-anchor-alarm (2.12.0 or later) plugin on the server.For how to drop, set and adjust the anchor watch, see the Anchor Watch entry in the Feature Browser (Main menu or More actions → What's New).
When the server calculates that the alarm radius has been exceeded it sends a notification which triggers the alarm message.
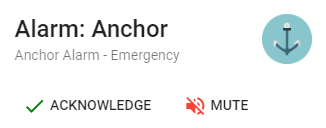
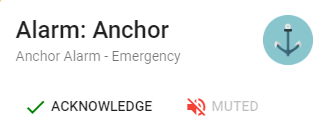
An alarm message will be either just Visual or also Audible depending on the content of the notification from the server. An audible alarm can be muted by clicking the Mute button.
Acknowledging the alarm will minimise the alarm icon.
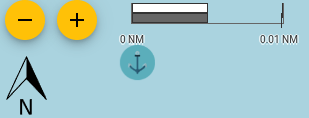
The icon will be displayed until the alarm has been cleared.
Clicking the icon will re-display the alarm message.
To clear the alarm and remove it from the screen click Acknowledge.
warning Alerts & Alarms
Freeboard will display Alerts and also provides the ability to raise alarms.When notifications are received, they are actioned as alerts based on their priority and method:
- Visual only (popup at the top of the screen)
- Sound only
- Visual & Sound as specified by the notification message received from the Signal K server.
The following Alarms can be raised:
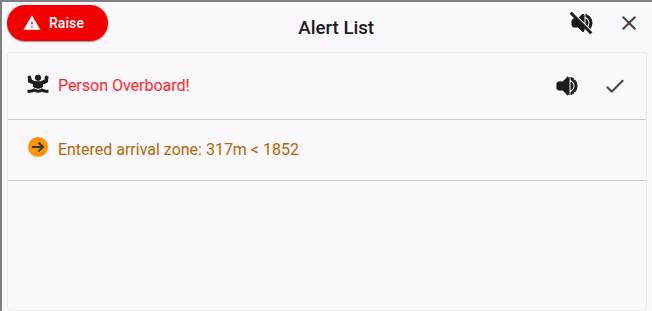
To RAISE an alarm:
- Click the warning button on the toolbar to display the Alerts List:
- Click the RAISE button and select the desired alarm type.
Freeboard allows alerts to be Acknowledged and / or Silenced.
- Silencing the alert will mute any sound and the alert card remains visible.
- Acknowledging the alert will close the alert card and silence any sound. The alert remains an entry in the Alert List.
- The Alert is cancelled.
- The alert condition is returned to a normal state.
- The notification for the alert path value is null.
Vessels
Freeboard displays vessels with the following icons:


- Show / Hide Vessels layer on the map
- Providing the ability select which Vessels to display.
This vector will only be displayed at higher zoom levels so as to reduce screen clutter.
You can select whether to use either True or Apparent wind data for displaying the vector.
This choice can be made in the Settings screen.
To Show / Hide the Vessels Map Layer:
-
From the more_horiz menu select
either:
- visibility Show Vessels
- visibility_off Hide Vessels
To Select Vessels:
- From the menu menu select directions_boat Vessels.
- Entering text to filter by vessel name.
- Toggling on Ship type to display based on their AIS Ship Type.
- Toggling IMO Only to show only vessels with IMO registration data. (This can be used in conjunction with the previous to options.)


- Filter Vessels: Type into the text box to filter the list of vessels.
- Display Vessel: Tick the checkbox to display the vessel on the map. Freeboard by default will display all vessels
- info_outline Info: Click this button to display the vessel properties.
-
center_focus_weak
Focus: Click this button to set this vessel as the
active vessel and direct all actions to this vessels path on
the Signal K server.
Note: Actions may fail if the Signal K server does not support PUTs to paths other than `vessels/self` - clear_all Unfocus: Click this button to reset the active vessel to self.

Note:If the Vessels layer is hidden selections made in this screen will not be displayed until the Vessels layer is made visible.
Playback History
Freeboard provides the ability to request historical data playback from the server.Note: Selecting this option from the menu disconnects the realtime stream.
Note: Playback history must be supported by the server.
- menu Main Menu: Access the history Playback History option from the Main menu.
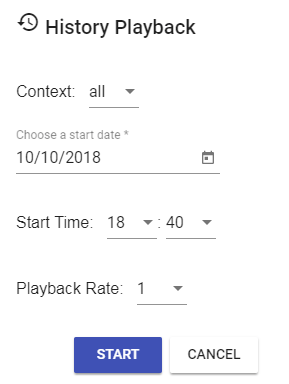
- Context: to choose vessel(s) data. self or all
- Start Date: Date of playback stream start
- Start Time:Time of playback stream start
- Playback Rate: Rate of playback. 1= real-time, 5= 5 x real-time
Click Cancel to re-start the real-time data stream.
Once started, Playback Mode is identified by the addition of the cancel button to the menu bar.
- Click cancel to end playback and return to realtime data stream.
settings Settings
The Settings screen is where you can configure Freeboard and it consists of the following sections:DISPLAY:
This section provides choices about how information is displayed.
-
Dark Mode Setting: Use this setting to control the display
theme (Light or Dark).
-
Use OS Setting - Selecting this option tells Freeboard
follow the preferred display mode set by the hosting
system.
Note: This uses the prefers-color-scheme CSS media setting, if the browser does not support this feature then the Light theme is selected. - Use Signal K Mode - Set the display mode using the value of the environment.mode path. Dark theme is used when value is "night".
- On - Turn Dark Mode on.
-
Use OS Setting - Selecting this option tells Freeboard
follow the preferred display mode set by the hosting
system.
- Auto-set Night Mode: Check this box to have the display dimmed when environment.mode value is 'night'.
-
Action Button: The action button is permanently displayed
at the lower right of the screen. Use this setting to select the
button function.
- Waypoint at vessel - Selecting this option will create a waypoint at the vessel's current location.
- Person Overboard - Selecting this option will raise a Person Overboard alarm.
- Autopilot Console - Opens and closes the autopilot console.
- Radar Overlay - Shows the radar on the chart and opens its control panel.
- A plugin's button - Any button added by a plotter extension plugin, listed by the plugin's name and the button's title.
-
Allow Device to Sleep: Check this option to disable the
devices WakeLock function which will allow your device to
enter sleep mode.
Note: this setting is only available on devices / browsers which support WakeLock functionality.
When this option is selected a visibility_off icon appears at the top right of screen. - Enable split view: Check this box to show the vertical_split Split view button, which opens a second chart beside or below the main one. See the Feature Browser → Split View.
- Live ETA at cursor: Check this box to show the bearing, distance and ETA from your vessel to the point you are pointing at in the status bar.
- Reference Boat Speed: The speed used to estimate the ETA when your vessel is stopped (at anchor, hove to) and there is no speed over ground to calculate from.
- Tap Fade Speed: The number of seconds the marker left by a click or tap on the chart takes to fade away. The readout stays held on that point until it does.
-
Instrument Panel App: Select from a list of installed
applications the one you wish to be displayed in the Instrument
Panel.
Note: The application selected should be responsive to display correctly within the space afforded by the instrument panel. - Parameters: Enter parameters that will be appended to the Instrument App url.
-
Halt App on hide: When checked the selected Intrument Panel
App will be stopped when the Panel is hidden.
To save resources on your device when the instrument panel is hidden clear this checkbox. -
Favourites: Use this to display a list of Web Apps
installed on the Signal K Server which can then be selected as a
Favourite.
These selected Web App can be "switched in" for display in the Instrument Panel.
- Do not Play Sounds: Check this box if you do not want any sounds played. (Overrides ALARM_METHOD in notification message.)
- Show DEPTH Alarm Messages: Check this box if you want received DEPTH notifications from the Signal K server to be displayed as an alarm message.
- Alarm Smoothing Time: Once the DEPTH alarm message has been acknowledged and the notification state has returned to Normal, this is the length of time that the notification must remain in Normal state before the alarm is re-triggered.
This section provides choices about the units and values used when displaying data.
Use Server Unit Preferences: On by default. When checked sets the Distance, Depth, Length, Speed and Temperature units to those selected on the Signal K server, and disables each selection below that the server sets. Only available when the server publishes unit preferences; without them the selections below stay editable.
Note: The server can also publish a unit for an individual path, which overrides the category setting for that value. Wind speed is currently the only value Freeboard applies this to. See Units & Value Display in the Feature Browser.
Distance Units: Kilometres / Nautical Miles
Depth Units: Metres / Feet / Fathom
Length Units: Metres / Feet
Speed Units: Knots / m/sec / km/h / mph
Temperature Units: Celsius / Fahrenheit
Prefer True / Magnetic values: True / Magnetic
Instructs Freeboard to use either the True or Magnetic value path for paths that are not listed in Preferred Paths. (Defaults to True)
Note: If the selected path type is not within the received data stream NO value will be displayed. Freeboard will NOT fallback to other available path values!
Preferred Paths: Some values are published on more than one Signal K path. This panel is where you choose which one Freeboard uses for True Wind Speed, True Wind Direction and Heading / COG.
Heading / COG sets the direction your vessel is pointed on the chart — the vessel icon, the heading line, the chart rotation in Heading Up mode, and the reference used when wind is published as an angle rather than a direction.
It defaults to Automatic, which uses the best source available at the time: true heading, then magnetic heading, then COG. Heading is preferred because it is where the bow is pointing — the difference between it and the course vector is your leeway and set. COG is only used when no heading has been received for 10 seconds and you are making more than about 0.5 knots, since a stationary vessel's COG is GPS noise and would make the icon spin. If neither is available the last known direction is held rather than reset.
Select a specific path instead if you want the direction locked to that one value.
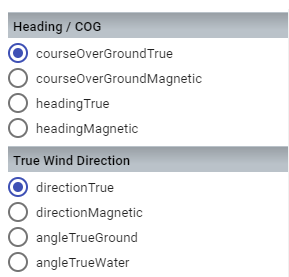
Select the path you want used for each value. Your selection applies immediately.
Note: Automatic is always offered. Explicit paths are offered only when they are present in the data stream received from the Signal K server. If none are, Freeboard still lists its default path for that value.
MAP:
- Feature label zoom level: Select the zoom level at which labels for features on the map appear. Labels will be hidden at zoom levels below this value.
-
Offset Vessel Center (%): Where the vessel sits on screen
while in "Follow Vessel" mode, so you can give yourself more
visible chart in the direction you care about. Each value is a
percentage of the distance from the center of the screen to its
edge, and both are measured relative to the screen, so the offset
holds its spot whether the vessel is underway, drifting, or at
rest.
- Vertical: moves the vessel up or down the screen, so 50 places the vessel half way between the center and the bottom edge, showing more chart ahead. A negative value looks behind the vessel instead.
- Horizontal: moves the vessel left or right. A positive value shifts the map to the right, showing more chart to the right of the vessel; a negative value does the opposite.
- Popover close with button: Select this option in order to a close a popover using a button rather than just clicking outside of it.
- Animate map movement: Glide the chart when it follows the vessel, turns in heading-up mode, or zooms with the zoom buttons, instead of jumping. On by default; turn it off on a slow device to save the extra rendering.
- Double click to Zoom: Select this option to enable zooming the map with a double click.
-
Map Pan When Following: Choose what panning the chart does
while "Follow Vessel" mode is on.
- Set Follow Offset: Follow mode stays on and panning sets the Offset Vessel Center values above, so you can position the vessel on screen by eye. The offset is saved and used from then on.
- Exit Follow Mode: Panning turns follow mode off. Choosing this reveals Resume Following After, which turns follow mode back on once the chart has been left idle for the selected period; each pan or zoom restarts the wait. Never (the default) leaves follow mode off until you turn it back on.
- Do nothing: Follow mode stays on and the vessel returns to its usual position on the next position update.
Options that apply to S57 charts.
- Graphics Style: Select this option in order to a close a popover using a button rather than just clicking outside of it.
- Boundaries: Select from Plain or Symbolized.
- Colors: Select from 2 or 4 colors.
- Shallow Depth: Enter the depth in meters.
- Safety Depth: Enter the depth in meters.
- Deep Depth: Enter the depth in meters.
- Layers: Select S57 layers to display (when avaiable).
COURSE:
This section provides settings for course navigation.
Auto-advance to next point on arrival: Check this option to automatically advance to the next route point once the target notification has been received.
Notification type to use: Select the notification from the server to use to trigger the advancement to the next point.
Choose either:
- perpendicularPassed (the vessel has passed the line through the destination, perpendicular to the leg.)
- arrivalCircleEntered (the vessel has entered the arrival circle.)
Time to wait before advancing: Select the period of time to elapse after the notification is received before the destination is set to the next route point: Immediately, or 1 to 30 seconds (default 5 secs). Available when Auto-advance to next point on arrival is checked. See the Feature Browser → Following a Route for the arrival countdown and how to cancel an advance.
VESSELS:
This section provides choices when displaying data for the vessel.
-
Vessel Icon: Select the icon used for your vessel (default
vessel symbol, sailing monohull, catamaran or powerboat) and its
size on the map. The default vessel symbol is the red sailboat, or
a symbol provider's own-vessel icon when one is installed.
Show vessel at actual size when zoomed in: Draw the vessel at its real length and beam when zoomed in closely. See the Feature Browser → Own Vessel Display. -
Fixed Location Mode: Select when operating from a fixed
location e.g. building, etc.
Selecting this mode will change the vessel icon to
Enter the latitude and longitude of the fixed location. - Display Wind Vectors: Select to display wind vectors for the vessel on the map.
- Display Laylines: Select to display laylines when navigating to a destination.
- Display Range Circles: Select to display a set of equi-distant circles on the map centered around the vessel. The distance between the circles will vary based on the map zoom level and is displayed next to the vessel.
-
Heading Line Length: Select length of heading line
displayed on the map.
- Default: Calculates the length of the line displayed based on the vessel SOG and the map scale.
- (x) nmi Length of the line to display.
- COG Line: Display a line to the predicted location based on the selected time and the vessel's current SOG.
-
Display Vessel Track: Check this box to display the vessel
trail (on by default). See the Feature Browser →
Vessel Tracks for how the trail is shown.
-
Track source: where the trail comes from.
- Auto (default): the server's recorded track when the server can supply one, otherwise a local cache on this device.
- Server: the track recorded by the server's Track API (signalk/v2/api/tracks, Signal K server 2.33 or later with a track provider). Unavailable when the server has no track source.
- This device: a local cache maintaining up to 5000 points at a 5 second interval, recorded while Freeboard is open.
-
Use the slider to set the length of track to retrieve
from the server, in hours, or All (the last stop) for
the whole recorded track. Time is relative to the current
time.
The Resolution settings set the finest spacing of track points requested from the server for the following time windows:- Last hour (default = 5 secs)
- 1 hour -> 24 hours (default = 5 secs)
- > 24 hours (default = 10 secs)
With a Track API (v2) server, the trail older than an hour is simplified by the server to suit the map's zoom, and fetched again when the zoom level changes. With the older track interface, Freeboard simplifies the trail itself, and the two older windows use 1 min and 5 min while left at their defaults.
-
Track source: where the trail comes from.
This section provides choices when displaying data for other vessels.
- Mark AIS Target inactive after: Maximum time (in minutes) elapsed between updates before the vessel is displayed as inactive.
- Remove AIS Target after: Maximum time (in minutes) elapsed between updates before the vessel is removed from map.
- Wind Vector Value: Wind True / Wind Apparent Value used to display wind vector for other vessels displayed on the map.
- Wind / Track Zoom Level: The minimum Zoom level at which other vessels' wind vectors are displayed. (Default=15)
- Show all tracks: Select to display the last 2 hours of the tracks of all other vessels in the map view, from zoom level 10. See the Feature Browser → Vessel Tracks.
- Picked vessel track length: How far back the track of a vessel picked with its TRACK button reaches (hours, default 12). Shown only while Show all tracks is off.
- Hide Moored: Select to hide vessels with a state of 'moored'. Note: Display is updated when next vessel update is received.
- Hide Anchored: Select to hide vessels with a state of 'anchored'. Note: Display is updated when next vessel update is received.
-
COG Line: Select to show / hide COG vector for AIS
vessels.
Note: COG line length is calculated for 10 mins duration.
RESOURCES
Notes:
- Display Notes on Map: Un-check this box if you do not want to display NOTES on the map.
- Notes Zoom Level: Select the zoom level at which NOTES will appear on the map.
-
Fetch Notes radius: Select the radius from the centre of
the displayed map within which NOTES will be retrived from
the server.
A request to fetch Notes is triggered when the map centre moves more than 50% of this value. -
Notes Fetch Filter: This field allows you to specify a
parameter string that will be used when fetching Notes from the
Signal K server. This can be useful to reduce the number of Notes
records returned or to only return Notes in a particular area.
The string can contain %Tokens% to specify specific values.
e.g. ?position=[%map:longitude%,%map:latitude%]&distance=%note:radius% -
Edit Group Names: By default the group attribute of
a note will not be available in the note editor screen.
Check this box if you want to be able to edit the group attribute. -
Position Group Note: By default adding a new note to a
group will not prompt you for the psoition of the note.
Checking this box will prompt you to place the note by clicking on the map. - Single Click for Note Details: Check this box to have a single click on a note open its details directly, rather than first showing the pop-up options.
Valid tokens include:
- map:latitude: Latitude at centre of Map
- map:longitude: Longitude at centre of Map
- map:zoom: Map zoom level
- note:radius: The value set in the Fetch Notes within field
Freeboard provides the ability display feature data contained in compliant JSON format layers on the map. The available resource paths are listed in this section and can be selected to enable them for use with Freeboard.
Note: This functionality requires that you have configured the Resources Provider plugin to serve the required resource paths.
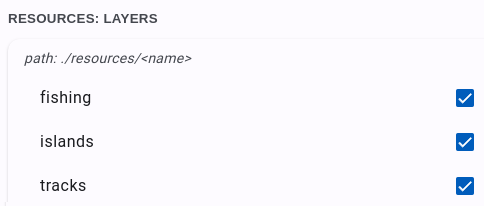
- Fetch Radius: When set, will only fetch resource set features with a position that is within the specified distance from the current map center. Select 0 to retrieve all features.
Data from the resource paths that you enable in Freeboard Settings is treated as ResourceSets.
ResourceSets are a non-standard Signal K resource format that can be created to form collections of features that can be displayed in layers on the map. They are a JSON file with a specific structure which can be created using any text editor.
The JSON structure chosen aligns closely with the current Signal K resource specification and adopts the use of GeoJSON FeatureCollection.
The ResourceSet file should be stored on the Signal K server in the folder used as the source for that path.
The file name should be a valid uuid (e.g. 0d95e282-3e1f-4521-8c30-8288addbdb69).
Check out the Freeboard Wiki for more details regarding the file format.
RADAR:
This section allows you to set the default RADAR device to use when there are multiple RADAR devices available.
Click the REFRESH button to fetch the list of RADARs from the Signal K Server.
The device list is locked while the RADAR is shown on the map.
Draw range circles at the radar range while it transmits: Select to draw range circles at the RADAR range around the vessel while the RADAR transmits, in place of the vessel range circles.
SIGNAL K:
This section allows you to set parameters for the Signal K stream connection to provide control over the type and number of features displayed on the map.
Note: The Signal K data stream can deliver a large volume of data depending on the data sources you have connected. The processing of large quantities of data can have a significant impact on application performance when many items are displayed on the map.
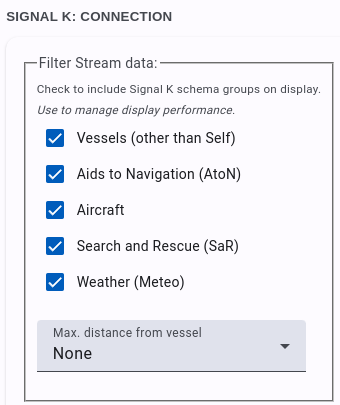
Filter Stream Data: Use the options in this section to select which Signal K context(s) will be used to display features on the map.
- Vessels: Display vessels (other than your own) on the map. (Default is checked)
- Aids to Navigation: Display AtoNs on the map. (Default is checked)
- Aircraft: Display aircraft on the map. (Default is unchecked)
- Search and Rescue: Display SaR beacons on the map. (Default is unchecked)
- Meteo (Weather): Display weather stations on the map. (Default is unchecked)
-
Max Distance from Vessel: Set the distance from your vessel
that targets must be within to be displayed on the map.
The distance represents the radius of a bounding box around your vessel.
Selecting None (default) will display all received targets.
EXPERIMENTS:
New features being assessed / tested for inclusion in Freeboard are referred to as Experiments.
To try out these features you will need to check the Experimental Features option in Settings.
Once enabled, you can access these features via the science button.
Note: Some experiments will require configuration settings to be made in the Signal K server Admin console under Plugin Config -> Freeboard-SK. VIDEO
Freeboard provides the ability to utilise the "Picture in Picture" (or PiP) feature in supported browsers to display a video stream from a source such as a video camera, etc.
- Enable Video: Check this box to enable the display of a PiP video stream.
- URL: Enter the url of the video stream source.
Click this button to open the video stream. The stream will start to play and the video window can be moved, resized and playback controlled using the controls provided by the browser.
tune URL Parameters
The following url parameters can be used to initalise values for:- Zoom Level
- North / Heading Up
- Move Map
- Signal K Host
- Port number
When one or more of these parameters are present, the supplied values will used to override stored configuration at start up.
Example: Start Freeboard-SK at zoom level to 15.
http://server:3000/@signalk/freeboard-sk?zoom=15
Example: Start Freeboard-SK in North up mode.
http://server:3000/@signalk/freeboard-sk?northup=1
or
http://server:3000/@signalk/freeboard-sk?northup
Example: Start Freeboard-SK in heading up mode.
http://server:3000/@signalk/freeboard-sk?northup=0
Example: Start Freeboard-SK in moving map mode (keep vessel
centered).
http://server:3000/@signalk/freeboard-sk?movemap=1
or
http://server:3000/@signalk/freeboard-sk?movemap
Example: Start Freeboard-SK with moving map mode turned off.
http://server:3000/@signalk/freeboard-sk?movemap=0
Example: Connect to Signal K server at supplied address and port.
http://server:3000/@signalk/freeboard-sk?host=192.168.86.32&port=3100